Creamy Southwest Chicken Alfredo – Easy 30 Minute Dinner

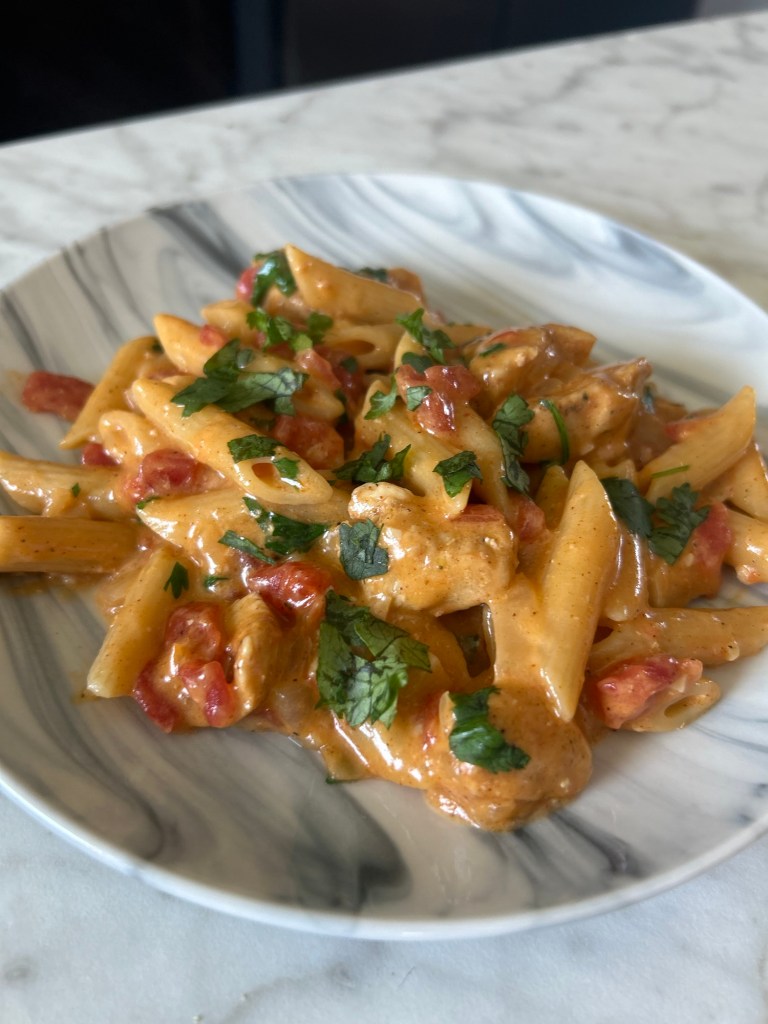
If you love classic Chicken Alfredo but crave a little extra kick, this Southwest Chicken Alfredo is for you! Creamy, cheesy, and full of bold flavor, this easy pasta recipe is perfect for busy weeknights. Plus, it’s ready in just 30 minutes!

Ingredients:

  • 1 lb. Chicken Breasts, cut into 1” strips
  • 1/2 lb. Penne Pasta
  • 1 (15oz.) can Diced Tomatoes
  • 1 cup Heavy Cream
  • 1 1/2 cups Cheddar Cheese, shredded
  • 1 cup Onion, chopped
  • 4 Garlic Cloves, minced
  • 1 tablespoon Honey
  • 1 tablespoon Olive Oil
  • 1 tablespoon Butter
  • 2 tablespoons Cilantro, chopped

Southwest Seasoning:

  • 1 1/2 teaspoon Chili Powder
  • 1/2 teaspoon Cumin
  • 1/2 teaspoon Oregano
  • 1 teaspoon Paprika
  • 1/4 teaspoon Black Pepper
  • 1/2 teaspoon Salt
  • 1/8 teaspoon Cayenne

Instructions:

1. In a small bowl, mix the southwest seasoning blend together

2. Add cut chicken to a large bowl and drizzle in honey and the seasoning blend. Toss to combine

3. Bring a large pot of salted water to boil and cook pasta according to package directions. Drain and set aside.

4. Heat olive oil in a large skillet over medium-high heat. Add chicken and cook until golden and fully cooked (about 6-8 minutes). Transfer to a plate

5. In the same skillet, add onion and butter. Cook for a few minutes until tender. Add garlic and cook another minute. Add diced tomatoes and bring to a low simmer.

6. Slowly pour in heavy cream while stirring until fully incorporated. Bring to a nice simmer. Add chicken back to the skillet. Sprinkle in cheddar cheese and stir to combine. Add penne pasta to the sauce and toss to combine. Remove pasta from heat and let sit a few minutes.

7. Top with fresh cilantro and extra cheese if desired. Serve immediately!

Tips & Variations:

Swap penne for fettuccine for a classic Alfredo feel. Add a pinch of cayenne or red pepper flakes for extra heat. Want more veggies? Add sautéed bell peppers or corn for a true Southwest vibe.

Cookware I Used:

I made this using my favorite nonstick pots and pans set—it’s a game changer in the kitchen!

👉 Check it out here (affiliate link)

If you’re looking for a dinner that’s packed with flavor, easy to make, and family-approved, this Creamy Southwest Chicken Alfredo is a must-try! It’s the perfect way to bring a little spice to your weeknight meal rotation without spending hours in the kitchen.

🎥 Watch the full recipe video here: https://youtube.com/shorts/I1lqrveSLow?si=xC0GFxJVWcnJaVej

If you enjoyed this recipe, make sure to subscribe for more quick, easy, and delicious meals for busy people just like you. Let’s make weeknight dinners stress-free together!

The Best Back-to-School Lunch Essentials for Kids

It’s that time of year again—school’s back in session and parents everywhere are getting back into the swing of lunch packing. Whether you’re a seasoned lunchbox pro or totally over it by week two (no judgment), having the right gear can make packing healthy, fun, and stress-free lunches way easier.

Below are my top picks for the BEST back-to-school lunch essentials for kids. These are all mom-tested, lunchbox-approved, and linked for easy shopping. (Yep, affiliate links included!)

🍱 Omie Lunch Box

This bento-style box is a game-changer for picky eaters and organized parents. It keeps hot food hot, cold food cold, and has separate leakproof compartments. Available in fun colors like Blue Sky and Cherry Pink.

• [Omie Lunch Box – Blue Sky](https://www.amazon.com/dp/B017SGIMV2?tag=fromworktotab-20)
• [Omie Lunch Box – Cherry Pink](https://www.amazon.com/dp/B0CTRTVZZF?tag=fromworktotab-20)

🍴 Utensils with Case

Compact, reusable, and easy to pack—these kid-sized utensil sets come with their own travel case.

• [Pink Utensil Set](https://amzn.to/3TY40mc)
• [Blue Utensil Set](https://amzn.to/3UtImpV)

🎒 Bentgo Lunch Bag

These insulated bags come in adorable patterns and fit the Omni lunch box perfectly. Plus, they’re easy to wipe clean.

• [Dino Print](https://amzn.to/41aPZFu)
• [Rainbows & Butterflies](https://amzn.to/41e6Nvk)

🥤 Kids’ Thermos Cups

Keep drinks cold all day with these adorable stainless steel tumblers. Choose your child’s favorite character!

• [Bluey Theme](https://amzn.to/3TWucNW)
• [Minnie Mouse](https://amzn.to/3GFcgEI)

❄️ Ice Packs

A must-have to keep lunches fresh until the lunch bell rings.

• [Colorful Slim Ice Packs](https://amzn.to/4kTe3Ur)

🔖 Personalized Labels

Never lose a lunch box again! These waterproof name labels stick to bottles, boxes, and more.

• [Custom Name Labels](https://amzn.to/3H3gS7y)

🎉 Lunch Box Accessories

From mini forks to silicone cupcake liners and sauce containers—these little extras make packing more fun.

• [Lunch Box Accessory Kit](https://amzn.to/450YbJB)

💌 Lunch Box Notes

Brighten your child’s day with a sweet message or silly joke. These pre-printed cards are adorable!

• [Lunch Notes for Kids](https://amzn.to/4mh670C)

🫙 Leakproof Dip Containers

Perfect for ketchup, ranch, yogurt, or peanut butter. No mess, no leaks.

• [Mini Dip Containers](https://amzn.to/3IMVeVS)

🍓 Sandwich & Fruit Cutter Set

Make lunch fun with this 18-piece set that cuts sandwiches, fruit, and veggies into cute shapes.

• [Fun Shape Cutter Set](https://amzn.to/4mdy35p)

✅ Want to make life even easier? Don’t forget to grab the free downloadable checklist — coming soon!

Pin this post. Share with a fellow parent. And if you try any of these lunch essentials, tag @fromworktotable — I’d love to see your lunch wins and hear what your kids loved!

🌶️ Spicy Smoked Sausage Alfredo Bake

Quick, creamy comfort food with a kick!

If you’re short on time but still want to serve something comforting and packed with flavor, this Spicy Smoked Sausage Alfredo Bake is about to be your new go-to. It comes together with simple ingredients, has just the right amount of spice, and delivers that cheesy, cozy goodness we all crave after a long day.

🎥 Want to see it in action?

Click here to watch the full video on YouTube!

I’ll walk you through the steps, share tips, and show you how easy it is to get that bubbly, cheesy top every time.

Why You’ll Love It

  • One pan for the sauce, one dish to bake.
  • Easy to make ahead and broil when you’re ready.
  • Customizable: turn up the heat or make it kid-friendly!

Ingredients

  • 16 oz pasta (penne or rotini)
  • 3 Tbsp butter
  • 2–3 cloves garlic, minced
  • 3 Tbsp flour
  • 1 cup chicken broth
  • 2 cups half-and-half
  • ½ tsp salt
  • ¼ tsp black pepper
  • ¼ tsp cayenne pepper (adjust to taste)
  • Pinch of red pepper flakes (optional)
  • ½ cup grated Parmesan cheese
  • 2 cups shredded mozzarella (divided)
  • 12 oz smoked sausage, sliced
  • Fresh parsley for garnish

Instructions

1. Cook the pasta until just shy of al dente. Drain and set aside.

2. In a large skillet, melt butter over medium heat. Add garlic and sauté for about a minute.

3. Whisk in the flour and cook for another minute to form a roux.

4. Slowly pour in chicken broth and half-and-half, whisking until smooth. Simmer until the sauce thickens (about 5 minutes).

5. Season with salt, pepper, cayenne, and red pepper flakes (if using).

6. Stir in the Parmesan and 1 cup of mozzarella until melted and creamy.

7. Add sausage and parsley. Stir in the cooked pasta until fully coated.

8. Pour into a greased 9×13” baking dish. Top with the remaining mozzarella.

9. Broil for 2–3 minutes, or until the cheese is bubbly and golden.

10. Garnish with fresh parsley and serve warm!

Make It Your Own

  • Milder version? Skip the cayenne and red pepper flakes.
  • Lighter option? Use smoked turkey sausage.
  • Veggie boost: Add spinach, mushrooms, or chopped bell peppers.
  • Make-ahead tip: Assemble up to 24 hours ahead and broil right before serving.

This dish is a total crowd-pleaser and perfect for busy weeknights or potlucks. It pairs beautifully with garlic bread and a simple green salad.

📌 Don’t forget to save this recipe and tag @FromWorktoTable if you give it a try! I love seeing your recreations.

📺 Watch the full recipe video here → Spicy Smoked Sausage Alfredo bake

🍑 Peach Overnight Oats

Mornings can be chaotic, but breakfast doesn’t have to be! This Peach Overnight Oats recipe is perfect for busy moms who need something quick and healthy, but also delicious. Just five minutes the night before, and you’ll wake up to a ready-to-go breakfast. I love to meal prep a few containers of these at the beginning of the week so I always have a grab-and-go option ready. It’s a lifesaver when I’m running behind and don’t have time to eat at home—but still want to avoid grabbing something unhealthy on the road.

Meal Prep Tip:

I like to prep a few of these at the beginning of the week using these leak-proof meal prep containers. They’re the perfect size for individual portions, stack neatly in the fridge, and the airtight lids keep everything fresh until I’m ready to grab one on the go—whether I’m racing to work, doing school drop-off, or heading out for errands.

As an Amazon Associate, I earn from qualifying purchases—thank you for supporting my blog!

Ingredients:

  • 1 ripe peach, diced
  • ½ cup old-fashioned oats
  • ½ cup milk or milk substitute (almond, oat, etc.)
  • 1 tbsp brown sugar (adjust to taste)
  • ½ tsp ground cinnamon

Instructions:

1. In a jar or container, add oats then pour in milk

2. Dice 1 ripe peach and add it to the container

3. Drizzle the brown sugar and cinnamon on top of the peaches

4. Cover and refrigerate overnight (or at least 4 hours). In the morning, give it a stir and enjoy cold—or warm it up if you prefer!

Tip: Add a spoonful of yogurt or chopped nuts for extra creaminess or crunch!

And that’s it — super simple, delicious Peach Overnight Oats ready to make your mornings easier. Give it a go and drop a comment if you try it or have any tweaks. Happy breakfasting!

🎥 Watch It Come Together

Want to see how easy these overnight oats are to make?

https://www.instagram.com/reel/DLqJhGYptKu/?igsh=ZnRzeWxiczlpMnIw

Because sometimes seeing it made makes all the difference. 🍑 🥣

🧃Healthy Store-Bought Snacks for Picky Eaters (That Actually Get Eaten)

Let’s be honest: I’ve spent way too much money on snacks my picky eater either took one bite of… and then dramatically declared “yuck,” or wouldn’t even try. 😅

Sound familiar?

Between work, school, and trying to get real food into small humans, I’ve learned the hard way which snacks are worth keeping on hand—and which just end up getting pushed to the back of the pantry and forgotten about.

So today, I’m sharing a list of healthy(ish) store-bought snacks that are picky-eater approved in my house, easy to toss in a bag, and available online (because if I can avoid another trip to the store, I will).

This post may contain affiliate links, which means I may earn a small commission if you purchase through them—at no extra cost to you! I only recommend what we actually use and love.

🍎 1. GoGo Squeez Applesauce Pouches

✅ No added sugar

✅ Comes in fun flavors

✅ Shelf-stable

🛒 https://amzn.to/3ZW4NYi

These are a lunchbox staple in my house and great for fruit on the go. The flavors feel “special” to kids, but the ingredients are simple enough to give me peace of mind. And bonus: no refrigeration required!

🧀 2. Annie’s Organic Cheddar Bunnies

✅ Organic

✅ Kid-friendly shape

✅ Great for portioning out

🛒 Here is the cheddar version: https://amzn.to/40si0rJ and here is the white cheddar version: https://amzn.to/3ZWKRV2. Both are great, but the white cheddar are more popular in my house.

Basically these are the “better” version of Goldfish, and great for kids who like crunchy, cheesy snacks but can’t do artificial flavors or colors.

🍓 3. That’s It Fruit Bars

✅ 2 ingredients

✅ Naturally sweet

✅ No preservatives

🛒 https://amzn.to/3GmAe7n

My youngest actually thinks these are candy and I enjoy them as well. They’re made with just fruit—no added sugar, no weird stuff—and come in a variety of flavors like apple + mango or apple + strawberry.

4. Hippeas

✅ Protein + crunch

✅ Vegan and Plant-based

✅ Alternative to other puffs that contain GMOs

🛒 https://amzn.to/4kj5iTp

My picky eater could eat these all day! If your kids like puffs (and let’s be honest, what kid doesn’t??), these are a great alternative. They’re made from Chickpeas, include 3 grahams of protein per serving, and are a snack I can feel good about my kids devouring a whole bag of.

🍪 5. MadeGood Soft Baked Mini Cookies

✅ Nut-free

✅ Hidden veggies

✅ Individually packed

🛒 https://amzn.to/40zucHg

Soft, sweet, and they don’t taste healthy—which is kind of the goal when you’re dealing with a selective eater. They’re school-safe and great for on-the-go.

🛒 Bonus Tip: Create a Snack Bin

I keep a low snack bin in the pantry with a few of these on rotation so my kids can help themselves (with supervision). It encourages independence—and limits the snack requests to what’s already approved.

💬 What Are Your Picky Eater Go-To’s?

If you’ve found a store-bought snack your kid actually eats without protest, I’d love to hear it!

Drop it in the comments or share it with me on Facebook!

Welcome to From Work to Table 👋

Hi, I’m Katie — full-time working mom, part-time chaos wrangler, and the creator of From Work to Table.

I wanted to share a little bit about why I started this blog because it comes straight from my heart. My 5 year old daughter has struggled with extreme picky eating essentially her whole life. At one point, she was down to just one safe food (milk) — and that was honestly terrifying and such a low point for me and my husband. I felt like I was failing her, worried she wouldn’t get the nutrition she needed. From breastfeeding to bottles to the dinner table, feeding her has always been a challenge.

It’s taken me a lot of time and courage to open up about our journey. There’s been judgment, frustration, and a lot of emotions along the way. But there’s also been growth, hope, and success — and that’s what I want to share with you.

This blog is here to be a place for anyone who’s dealing with picky eating to feel understood, find support, ask questions, and get ideas that have actually worked for my family.

Like so many of you, I’m also balancing a busy work schedule, a bustling home life, and two kids. Mealtime can feel like a chore, but I believe it can also be one of those little wins that make the day feel a bit more manageable.

From Work to Table is all about:

  • Fast, family-friendly recipes (yes, even ones picky eaters might actually eat)
  • Simple kitchen tips and time-savers
  • Realistic meal ideas that don’t require hours or 27 ingredients
  • Support and solidarity for working parents just trying to get dinner on the table
  • Home-cooked healthier variations of processed foods your kids love

This space isn’t about perfection. It’s about real food for real life. Whether you’re here for recipe inspiration, a sense of community, or just a place to say “OMG SAME” — welcome. I’m so glad you’re here.

📸 Come say hi!

If you’re here, I’d love to hear from you! Drop a comment below to introduce yourself or share a little about your own picky eater story or anything else you may be going through. Let’s connect and support each other on this journey.

Join me on Instagram at @fromworktotable for behind-the-scenes peeks, real-life wins (and flops), and lots of quick ideas for feeding your family.

You can also join the conversation in the From Work to Table Facebook group — a community of busy parents sharing their favorite go-to meals, tips for picky eaters, and all the small moments that make this parenting journey a little easier.

👉Join the Facebook group here

Let’s make mealtime a little easier — and a lot more real — together.

💛

Katie

🧀 Healthy Homemade Goldfish Crackers

If there’s one thing my daughter has always loved, it’s crackers. But cheese? Not a chance. For the longest time, she wouldn’t go near it — no matter how I tried to sneak it in. That’s when I realized Goldfish crackers were the perfect bridge: she adored them, and they just so happened to be made with cheese.

That little discovery inspired me to try making them at home. I wanted a version with real, simple ingredients and hoped that by baking them together, she might warm up to the idea of cheese in a new way. Spoiler: it worked! These healthy homemade goldfish crackers quickly became a favorite, and they’ve helped introduce her to a food she used to avoid completely.

Made with sharp cheddar, cold butter, and just a few pantry staples, these crackers are cheesy, crispy, and perfectly snackable. Hand-grating a good quality cheese really brings out the flavor, and cutting them into fun shapes makes it a kid-friendly kitchen activity too.

If you’ve got a picky eater at home (or just want a better version of a classic snack), this recipe is a great place to start.


Snack time just got an upgrade 🧀🐟
These golden, cheesy little crackers are made with real ingredients — and lots of love. 💛

🧾 Ingredients:

  • 2 cups (8 oz) shredded cheddar cheese
    Use a high-quality sharp cheddar for the best flavor. Hand-grating is recommended — pre-shredded cheese often contains anti-caking agents that can affect texture.
  • 1 cup all-purpose flour (can sub ½ whole wheat flour for extra fiber)
  • 4 tbsp unsalted butter, cold and cut into cubes
  • 1–2 tbsp ice water, as needed
  • Salt, as needed

👩‍🍳 Instructions:

1. Preheat the oven to 350°F (175°C). Line a baking sheet with parchment paper.

2. Combine the cheese, flour, and butter in a food processor. Pulse until the mixture resembles coarse crumbs.

3. Add 1 tablespoon of ice water and pulse until the dough comes together in a ball. If needed, add the second tablespoon gradually.

4. Form the dough into a disc, wrap it in plastic wrap, and chill for 15–20 minutes in the fridge. (This helps the dough roll out more easily.)

5. Roll out the dough on a floured surface to about ⅛ inch thick.

6. Cut out shapes using mini cookie cutters (a goldfish shape if you have one, or other fun kid-friendly cutters). Re-roll scraps as needed.

This is the cutter I used from Amazon. inexpensive and easy for little hands. https://amzn.to/4exsWdC

7. Place on the baking sheet, sprinkle with salt if desired, and bake for 10–12 minutes, or until crispy and lightly golden.

8. Cool completely before serving. Store in an airtight container for up to 5 days.

👩‍🍳 Tips for Success:

  • Cheese matters! A good quality cheddar adds more flavor and richness — it’s worth the upgrade.
  • Grate it fresh for the best texture and melt.
  • Get the kids involved — rolling and cutting shapes is a great way to include them in the kitchen. My daughters loved this part!

👶 Snack-Time Tips

  • These store well in a sealed container for up to 5 days — though they rarely last that long in our house!
  • You can freeze extra dough and roll it out fresh when you’re ready to bake.
  • Let your kids help cut the shapes — it’s a fun activity for little hands.

🧡 Final Thoughts

There’s something so satisfying about swapping a store-bought snack with something homemade, especially when it’s just as loved by the kids. These crackers are cheesy, crisp, and just the right size for little fingers.

Give them a try and let me know what shape your family picks!

💬 Let’s Chat!

I’d love to hear how these crackers turned out for you — especially if you’ve got a picky eater at home too! Did you try a fun shape? Did your little one help in the kitchen?

Come say hi and share your snack-time wins (or questions!) over on Instagram:

📸 @fromworktotable

You can also join the conversation on Facebook at From Work to Table — where we’re swapping stories, recipes, and mom hacks every day. Because we’re all in this together 💛 From Work To Table

🍎 Apple Cinnamon Pancakes Recipe

Looking for a quick, healthy, and picky-eater-approved breakfast? These Apple Cinnamon Pancakes are soft, fluffy, and naturally sweetened with grated apple. They’re made with pantry staples and come together in just 15 minutes — perfect for busy school mornings or slow weekend brunches.

🧾 Ingredients:

  • 1 red apple, peeled and grated
  • 1 egg
  • ½ cup flour
  • ¼ cup milk
  • 1 tsp baking powder
  • 1 tsp cinnamon

👩‍🍳 Instructions:

1. Prep the apple: Peel and grate the apple into a bowl.

2. Mix: Add the egg and stir to combine.

3. Add dry ingredients: Stir in flour, baking soda, and cinnamon.

4. Pour in milk: Mix until a thick batter forms.

5. Cook: Heat oil in a nonstick pan over medium heat. Spoon batter into the pan in small portions.

6. Flip: Cook until edges bubble and bottoms are golden. Flip and cook the other side until done.

💡 Mom Tips

  • Double the recipe and freeze extras for a grab-and-go weekday breakfast.
  • Add mini chocolate chips or raisins for fun, kid-friendly twists.
  • Serve with maple syrup, yogurt, or a smear of almond butter for extra flavor and protein

💬 Final Thoughts

These Apple Cinnamon Pancakes are a cozy, comforting way to sneak fruit into your family’s morning without any complaints. They’re quick, versatile, and most importantly — kid-approved! 🙌

If you make this recipe, tag me on Facebook or share a pic — I’d love to see your creations!From Work to Table

🍫 Mini Muffins (Kid-Approved + Lunchbox-Ready!)

Let’s be honest—mornings are chaos. Between missing socks, packed schedules, and last-minute “Mom, I need a snack for school!” moments, breakfast (or snack prep) often gets pushed to the bottom of the list.

Enter: these super easy Mini Muffins.

They take less than 20 minutes, use one bowl, and somehow manage to please both my not-picky child and my extremely picky one—which is a win in any parent’s book. 💪


Mini, fluffy, and packed with just enough chocolate (or other add-in) to keep little hands reaching for more.

📝 Ingredients

Just a few pantry staples (and a shortcut!) are all you need:

  • 1 cup of pancake mix or choice
  • 1 egg
  • 1/2 cup milk
  • Optional add-ins of choice
  1. Preheat your oven to 350°F (175°C).
  2. In a medium bowl, mix muffin mix, egg, and milk until just combined.
  3. Scoop the batter into a mini muffin pan—grease it or use liners for easy cleanup.
  4. Sprinkle a few chocolate chips or other add-on on top for fun (optional but recommended!).
  5. Bake for 10–12 minutes or until lightly golden and a toothpick comes out clean.
  6. Let them cool slightly… or eat them warm if your kids don’t want to wait.

⏱️ Time-Saving Breakdown:

  • Prep time: 5 minutes
  • Bake time: 10–12 minutes
  • Total time: About 15–20 minutes

🧁 Why We Love These:

  • Kid-approved by even the pickiest of eaters (yes, mine!)
  • Perfect for lunchboxes, road trips, or after-school snacks
  • Freezer-friendly: stash a batch in a zip-top bag for emergencies
  • Minimal mess = happy mom

💡 Tips:

  • Add a splash of vanilla or a pinch of cinnamon for flavor boosts
  • Use a cookie scoop to keep muffin sizes consistent
  • Want to sneak in something extra? Fold in mashed banana or grated zucchini

💬 Let’s Chat:

Have a picky eater win with this recipe?

Share your version in the comments or tag me on Facebook at From Work to Table — I’d love to see how your batch turned out!

🍌 5-Ingredient Banana Oat Cookies (Easy + Picky-Eater Friendly)

These are my go-to cookies when we want something sweet, fast, and not packed with sugar or drama. With only five ingredients (plus whatever extras you have), they’re perfect for after-school snacks or “oops, I forgot it’s bake sale day” moments.

One of my kids thinks these are basically breakfast. The other only eats them if I sprinkle sea salt and throw in chocolate chips—so of course, that’s what I do.

Ingredients

  • 2 ripe bananas (the spottier, the better)
  • 1/2 cup peanut butter
  • 1 tsp vanilla extract
  • 1/2 cup oats (quick or rolled)
  • Chocolate chips or other add-ins (optional: raisins, chopped nuts, shredded coconut)
  • Sea salt for sprinkling (optional but delicious)

Instructions

  1. Preheat your oven to 350°F (175°C). Line a baking sheet with parchment paper.
  2. In a bowl, mash the bananas with a fork until smooth.
  3. Stir in the peanut butter and vanilla until combined.
  4. Add oats and mix until everything comes together. Fold in chocolate chips or any extras.
  5. Scoop small spoonfuls onto the baking sheet and gently flatten. Sprinkle with sea salt if using.
  6. Bake for 12–15 minutes, or until the edges are slightly golden.
  7. Let cool for 5 minutes (or don’t—it’s your kitchen).

Recipe Notes

  • Want them chewier? Add more oats.
  • Allergic to peanut butter? Try almond butter or sunflower seed butter.
  • These freeze well—just toss them in a zip bag after they’ve cooled.

Prep & Cook Time

Prep time: 5 min Cook time: 12–15 min Total time: ~20 min Makes: 10–12 cookies

Variations

  • Add cinnamon, flaxseed, or chia for extra nutrition.
  • Turn them into “breakfast cookies” with dried fruit + coconut.
  • Use dark chocolate chunks and flaky salt for grown-up snack energy.

Storage

  • Store in an airtight container for 3 days at room temp or 5–6 days in the fridge.
  • Freeze flat in a bag or container for up to 1 month.

Did your picky eater approve these? (Even a nibble counts!)

Tag me @fromworktotable or leave a comment—I’d love to see your cookie twist.

From Work To Table